Vue学习笔记 – Vue的响应式原理

这是Vue官网中提供的响应式原理示意图,总结起来我们最常见到的响应式原理的答案就是:
使用Object.defineProperty将所有属性使用setter和getter进行劫持,在读取数据和写入数据时进行拦截处理
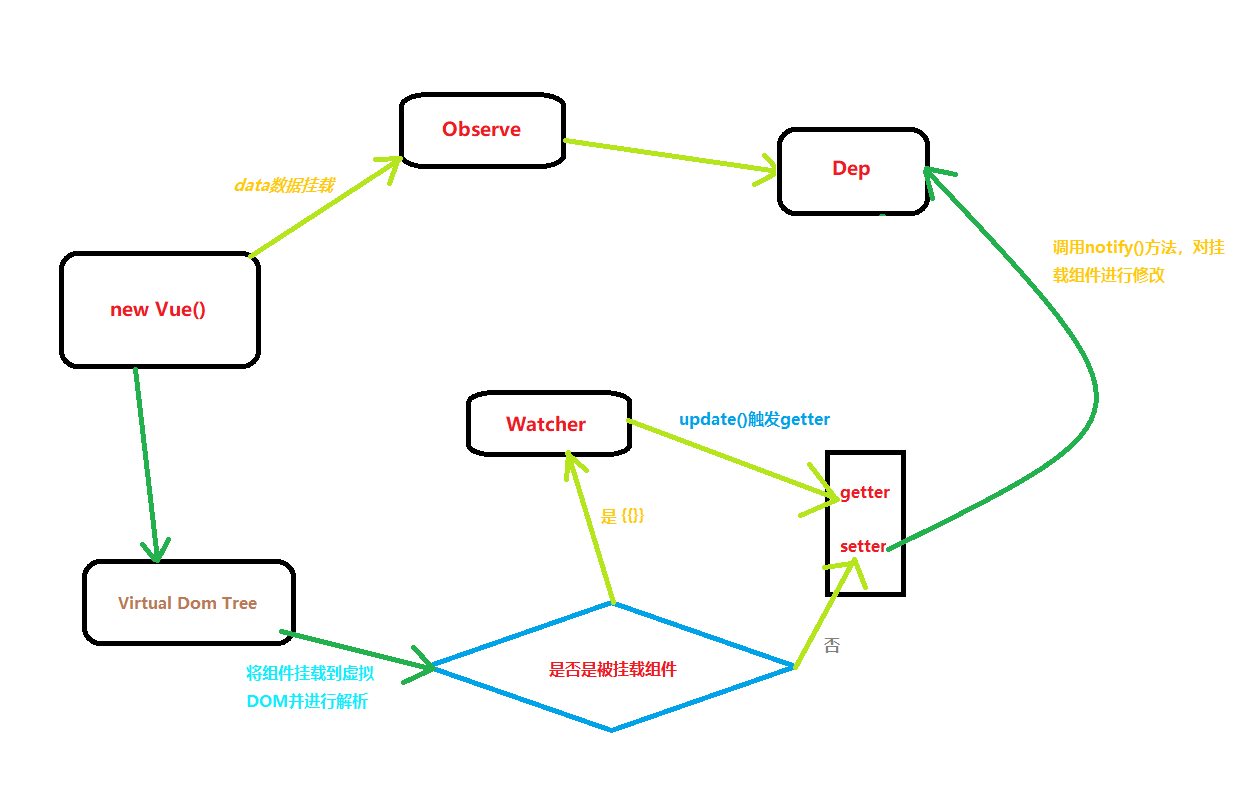
这是我自己总结的响应式流程:
然而这只是响应式原理中的一小部分,下面时是我用自己的话总结的响应式原理:
Vue的响应式原理是通过使用订阅者-发布者模式,配合Object.defineProperty将所有data中的属性进行写入与 获取的劫持,将每一个属性对应一个Dep对象,解析并存储某一属性所对应的vm实例,当属性值发生改变时,Watcher会通知该属性所关联的所有vm实例进行数据更新,者就是响应式的基本原理
一、什么是Object.defineProperty
Object.defineProperty(obj, prop, descriptor)是js对象操作的常用api之一,他对应的三个参数分别是: 需要被定义属性的对象, 要定义或修改的属性,数据描述符或存取描述符
configurable
当且仅当该属性的configurable键值为true时,该属性的描述符才能够被改变,同时该属性也能从对应的对象上被删除
enumerable
当且仅当该属性的enumerable键值为true时,该属性才会出现在对象的枚举属性中。
value
该属性对应的值,可以是任何有效的JavaScript值(数值、对象、函数等)
writable
当且仅当该属性的witable键值为true时,属性的值即value,才能被赋值运算符改变。
get
属性getter函数,如果没有getter,则为undefined。当访问该属性时,会调用此函数。执行时不传入任何参数,但是会传入this对象(由于继承关系,这里的this并不一定是定义该属性的对象)该函数的返回值会被用作属性的值
set
属性的setter函数,如果没有setter函数,则为undefined当属性值被修改时,会调用此函数。该方法接收一个参数(也就是被赋予的新值)会传入赋值时的this对象
二、什么时订阅者-发布者模式
下面有个场景可以描述订阅者-发布者模式:
当我们使用微信关注公众号后,公众号会定期想你推送新消息,在这个场景下我们就是订阅者而公众号就是发布者
我们先定义一个发布者对象
1
2
3
4
5
6
7
8
9
10
11
12
13
14
15
16
17
| class Dep {
constructor() {
this.subscribs = []
}
addSub(sub) {
this.subscribs.push(sub)
}
notify() {
this.subscribs.forEach(item => {
item.update()
})
}
}
|
接下来我们定义数个订阅者
1
2
3
4
5
6
7
8
9
10
11
12
13
14
15
| var sub1 = {
update() {
console.log('sub1发生改变')
}
}
var sub2 = {
update() {
console.log('sub2发生改变')
}
}
var sub3 = {
update() {
console.log('sub3发生改变')
}
}
|
定义之后我们将所有订阅者存入发布者对象中,然后进行发布
1
2
3
4
5
6
| var dep = new Dep();
dep.add(sub1);
dep.add(sub2);
dep.add(sub3);
dep.notify();
|
这样dep就会通知已经进行订阅的用户进行数据修改并更新视图,也就完成了发布者的基本功能
这里我们直接定义一个订阅者:
1
2
3
4
5
6
7
8
9
10
11
12
13
14
| class Watcher {
constructor(node, name, vm) {
this.node = node;
this.name = name;
this.vm = vm;
Dep.target = this;
this.update();
Dep.target = null;
}
update() {
this.node.nodeValue = this.vm[this.name]
}
}
|
当数据发生改变时,直接使用new Watcher(node, name, this.vm)对数据进行修改
三、Vue2的响应式原理
在Vue中我们应该先定义一个Vue的对象
1
2
3
4
5
6
7
8
9
10
| class Vue {
constructor(options) {
this.$options = options;
this.$data = options.data;
this.$el = options.el;
new Observe(this.$data);
}
}
|
创建发布者对象
1
2
3
4
5
6
7
8
9
10
11
12
13
14
15
16
17
| class Dep {
constructor() {
this.subscribs = []
}
addSub(sub) {
this.subscribs.push(sub)
}
notify() {
this.subscribs.forEach(item => {
item.update()
})
}
}
|
定义一个Observe对象,对data中的属性进行劫持
1
2
3
4
5
6
7
8
9
10
11
12
13
14
15
16
17
18
19
20
21
22
23
24
25
26
27
28
29
| class Observe {
constructor(data) {
this.data = data;
Object.keys(this.data).forEach(key => {
this.defineReactive(this.data, key, data[key])
})
}
defineReactive(data, key, val) {
const dep = new Dep();
Object.defineProperty(data, key, {
configurable: true,
enumerable: true,
set(newValue) {
if(newValue === val) {
return
}
val = newValue;
dep.notify()
},
get() {
if(Dep.target) {
dep.addSub(Dep.target)
}
return val
}
})
}
}
|
将data中的所有属性使用_proxy进行代理
1
2
3
4
5
6
7
8
9
10
11
12
13
14
15
16
17
18
19
20
21
22
23
24
25
26
27
28
| class Vue {
constructor(options) {
this.$options = options;
this.$el = options.el;
this.$data = options.data;
new Observe(this.$data)
Object.keys(this.$data).forEach(key => {
this._proxy(key)
})
}
_proxy(key) {
Object.defineProperty(this, key, {
configurable: true,
enumerable: true,
set(newValue) {
this.$data[key] = newValue
},
get() {
return this.$data[key]
}
})
}
}
|
配置订阅者对象
1
2
3
4
5
6
7
8
9
10
11
12
13
14
15
| class Watcher {
constructor(node, name, vm) {
this.node = node;
this.name = name;
this.vm = vm;
Dep.target = this;
this.update();
Dep.target = null
}
update() {
this.node.nodeValue = this.vm[this.name]
}
}
|
配置正则处理规则
1
| const reg = /\{\{(.*)\}\}/;
|
配置视图解析对象
1
2
3
4
5
6
7
8
9
10
11
12
13
14
15
16
17
18
19
20
21
22
23
24
25
26
27
28
29
30
31
32
33
34
35
36
37
38
39
40
41
42
43
44
45
46
| class Compiler {
constructor(el, vm) {
this.el = document.querySelector(el);
this.vm = vm;
this.frag = this._createFragment();
this.el.appendChild(this.frag)
}
_createFragment() {
const frag = document.createDocumentFragment()
let child;
while(child = this.el.firstChild) {
this._compile(child);
frag.appendChild(child)
}
return frag
}
_compile(node) {
console.log(node);
if(node.nodeType === 1){
const attrs = node.attributes;
if(attrs.hasOwnProperty('v-model')) {
const name = attrs['v-model'].nodeValue;
node.addEventListener('input', e => {
this.vm[name] = e.target.value;
})
}
}
if(node.nodeType === 3) {
console.log("node: " + node.nodeValue);
console.log(reg.test(node.nodeValue));
if (reg.test(node.nodeValue)) {
const name = RegExp.$1.trim()
console.log('name: ' + name);
new Watcher(node, name, this.vm)
}
}
}
}
|
完善Vue对象的创建过程
1
2
3
4
5
6
7
8
9
10
11
12
13
14
15
16
17
| class Vue {
constructor(options) {
this.$options = options;
this.$el = options.el;
this.$data = options.data;
new Observe(this.$data);
Object.keys(this.$data).forEach(key => {
this._proxy(key)
});
new Compiler(this.$el, this)
}
}
|
总结
总结起来响应式的过程大致如下:
- 定义Vue对象,将Vue对象中的data属性值进行响应式挂载, Observe
- 在Observe中对每一个属性进行劫持处理,添加setter和getter方法,,在watcher的 update()方法被调用时,会自动执行getter方法,此时将这个Watcher对象(即订阅者)添加到发布者中
- 每当数据变化时就会触发该属性对应的Dep对象中的notify()方法,通知所有成员进行数据更新
- 订阅者此时触发update()方法,改变了Watcher中对应node的nodeValue,也就是视图显示的数据
- 就这样形成了数据的双向绑定,即视图值修改,数据值即修改,反之亦然